Sunday, January 19, 2014

Journey to App - Part 2: Layout and Wire Framing

This is the second post in my series on writing and publishing iOS Apps.  (Check out Part 1).

This post will review my second step in developing an App; Layout and Wire Framing.  Once you have the basic idea for the App, and the basic user requirements, the next step that I follow is to layout the main interface for the App.  For me, this activity serves as a first pass through how the user will interact with the app, and it also blocks out the main functionality that the App will need to have.

For wire framing, you can use anything from paper and pencil, to a specialized program.  A few apps that I use on the iPad include iMockups for iPad and Noteshelf for iPad.

When laying out an app, you need to determine if the App is targeted for the iPhone/iPod, the iPad, or both.  For the Webpage to PDF App, we want to target both the handheld and tablet form factors.   When laying out the App, it is important to think about how the user will interact with the app when it is run on a handheld or tablet, and try to optimize the user experience based on the different devices.

For the Webpage to PDF app, we have identified two main functional paths ... selecting and viewing PDF Files, and selecting, viewing and converting web pages. 


On a handheld device, these two functions will be handled similarly.  There should be a list (or "TableView" to display the list of documents, or URLs.  When a user taps on one of the list items, the phone will show the item full screen.  On the iPad, there is more screen real-estate, so we can display both the list and the content at the same time.

For a complex App, you should probably run the layouts by a User Experience (or UX) expert. I happen to know one, so if he has any comments ... I'll add them to post.

The pictures below show the App layout that I did using iMockups.
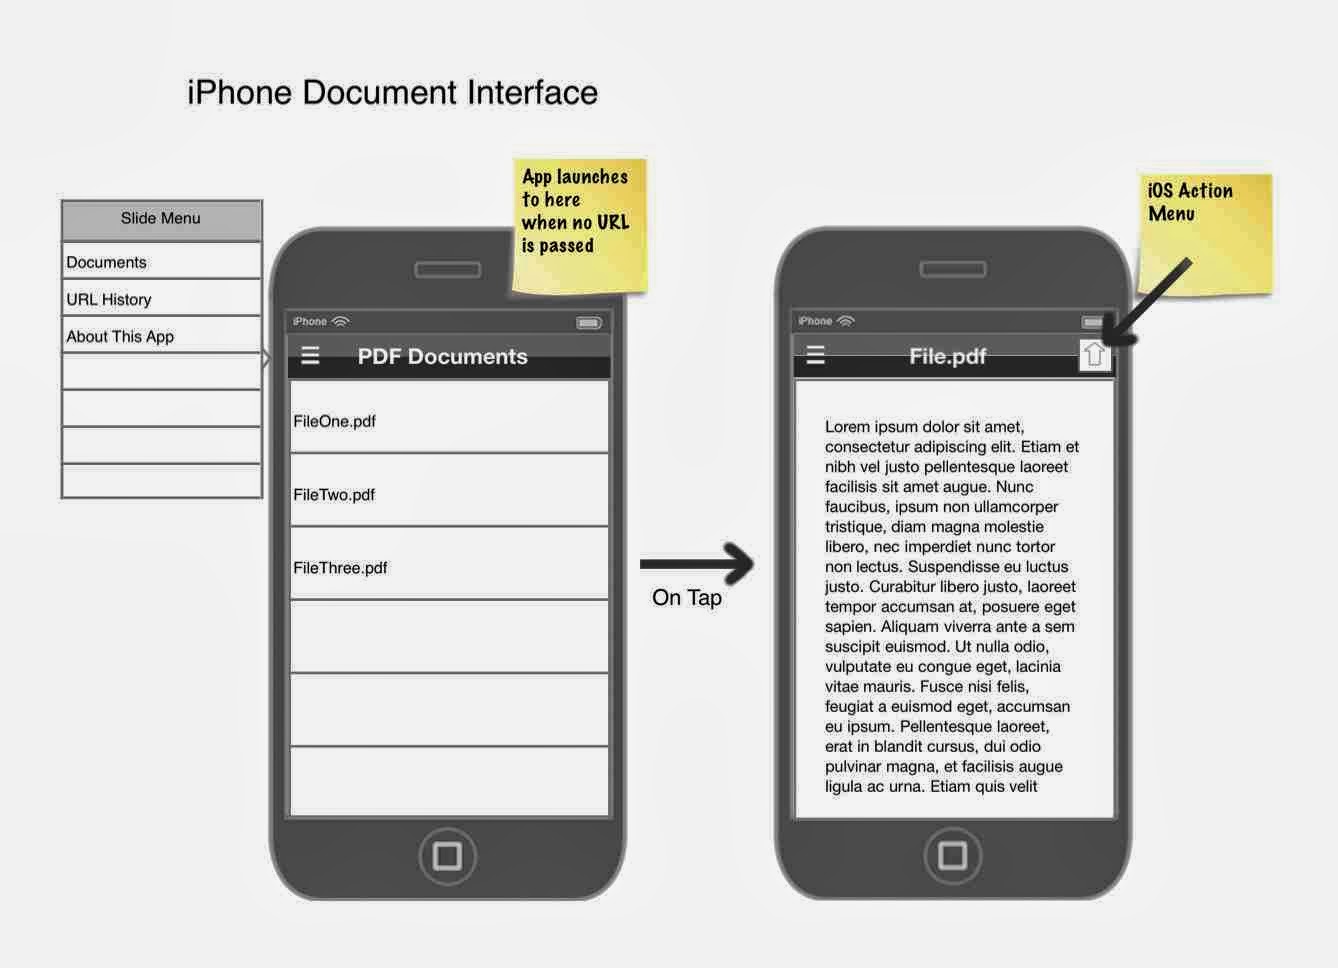


 With the layout drafted, it is time to start the programming.

Up Next ... Development Tools.  In the next post, I will discuss the tools that I use for app development.

See anything missing from the layout?  ... add a comment below!


Previous Part 1 
Next Part 3 - Tools 

Saturday, January 18, 2014

Journey to App: Writing and publishing an iOS App Part 1

For the last few years, I have been developing and publishing some iOS and android apps.  I published a few apps for my previous employer, and I have published a few for myself.  (Check out SnackableApps.com for my currently published Apps).

When I tell people that I write apps, they often ask about the process and how hard is writing an App.  Depending on their technical background, it isn't always an easy question to answer.

So I decided to do a series of blog posts that will document the process I use to develop an app.  As a companion to these posts, I will also Open Source the App Code, and in the end, I'll publish the app to the Apple App Store and you can download the App. 

Please NOTE: This blog series is NOT a HOW-TO.  Google is a wonderful reference if you need specific help on a topic, and there are great communitties of wonderful, helpful people that will point you in the right direction.  This series IS a description of the process of writing an App.  I hope you enjoy the posts ... and add comments if you have any.

The app process is more than just writing software code, and I will also cover setting up the support system, monetizing the app, and some basic App marketing as well.

The focus of this post will be "The Idea".

Each app has to start with an idea.  Now, coming up with ideas for apps is not that difficult ... coming up with an idea for a great app, that is very elusive.

For this series of posts, I decided not to tackle anything too ambitious, so I want to start with a pretty simple problem to solve.  I often come across articles and information on the web that I either want to read later, or that I want to save.  A really good way to do that (and one that I use on my laptop) is to save the web page to PDF.

So the focus of this App will be to save a web page to PDF.  Yes I know there is a bunch of apps out there (paid and free) that do this, but I think that it is a good problem for this series of posts.  (Comment on this post if you would have different ideas that you think would be interesting to write an blog series on).

Web Pages to PDF ...  What are the Requirements
So ... what does the App need to do?  Defining the "User Requirements" should be the first step in evaluating an idea and developing an App.  Here are the requirements for our PDF App. (have additional requirements?  add them in the comments).

In iOS on the iPhone or iPAD, most people browse the web using either Safari or Chrome.  It is unlikely that they will open up the App to browse the web, so ...
1. We need to pass a URL from Safari or Chrome to the App

Some web sites require a password, or other user input, so ...
2. The App needs to show the web page so that the user can interact before creating the PDF

Web addresses often do not provide good "file names" that would be required for naming the PDF File, so ...
3. The user needs to be able to set the file name, but it would be nice if the App could propose a file name from the URL

Assuming that the user will use the App more than once ..
4. The App needs to be able to display a list of the PDF files that the user has created.
5. The App needs to be able to read / display the PDF
6. The App needs to be able to send the PDF file to other apps, such as iBooks or Good Reader
7. The user needs to be able to delete PDF files that they no longer want.

It is possible that the user may want to create PDFs of the same URL more than once (say for a news site or other sites that change content frequently), so ...
8. The App needs to be able to save and display the history of URLs that have been converted.
9. The user needs to be able to delete URLs from the history list.

Sounds like enough requirements to make the App usable for many users, but still keeps the app Simple. 

Next up ... Laying out the App ... Once we have the requirements understood, it is time to start laying out (also called wire framing) the App.

That will be the topic of our next post.

Hope that you will follow me on this journey to an iOS App!

Next: Part 2

Tuesday, December 10, 2013

How to Unlock a "stuck" in Lock file on Mac OS X

I recently copied a file over the network from my Win8 machine to my Mac.

I then went to delete the file, but the system wouldn't let me stating that the file was locked, giving me the error message:

"The operation could not be completed because the item '(item name)' is locked."

I checked the standard approach to solve a file issue, using the GET INFO option on the file.  However, the check box to unlock the file was greyed out.  

So a bit of trial and error, and I found that if you have the developer tools, you can easily do this from the command prompt.

Open up a terminal and change directories to the location of the locked file.

at the terminal prompt, type
/Developer/Tools/SetFile -a l filename   (that is a lowercase "L" not a pipe "|")

To unlock all the files in the current directory, use a *

/Developer/Tools/SetFile -a l *

Voila!


Thursday, September 1, 2011

Enabling Aperture on Non Administration Account

Wow,

I haven't written a post in a while ... life gets busy!  (Wordy post ... Jump down for the solution)

Well, my iPhoto Library is enormous!  30,000 items and over 65 GB.  With new 10+ megapixel cameras out there, the growth rate is just going to increase!

So performance of iPhoto is getting abysmal!

I did a little research and looks like Apple is pushing Aperture as the next step (and they dropped the price in the App Store to $79) so I downloaded the trial (http://www.apple.com/aperture).

Of course, the install was a piece of cake, and I got the trial license ... however, when I went to run it from  my normal day-to-day non-admin account, it just Hung ... spinning beach ball ... nothing.

After some tinkering, I noticed that I could run Aperture fine from the administration account.  So I figure, this must be a permissions thing ... as I am pretty busy, I figured I would call Apple Support and speed up the solution!  Big Disappointment!!!  The person I talked to was not as knowledgable as I would have expected, and their answer was that you had to run Aperture from an administration account because it was a "professional" app.

What !?! That goes against everything I have ever read about the Mac and why OS X is secure.  It even goes against Apple's published security guidelines (https://ssl.apple.com/support/security/guides/)!  As I quote from the Snow Leopard guideline:
Unless you need administrator access for specific system maintenance tasks that cannot be accomplished by authenticating with the administrator’s account while logged in as a normal user, always log in as a nonadministrator user. Log out of the administrator account when you are not using the computer as an administrator. Never browse the web or check email while logged in to an administrator’s account.
Undaunted by the lack of knowledgeable tech-support (rant over), I dug in.  First I checked the normal locations (preferences and application support for Aperture) to ensure permissions were correct, but everything seemed good. Using the fs_usage command line utility, I started tracking what files Aperture was using.  I noticed that there was file access to the /Macintosh HD/Library/Application Support/ProApps folder.

Setting Permissions on that folder and enclosed items resolved the issue!

Step by Step Guide How To Run Aperture from Non-Administration Account
  • Install Aperture and Activate License from Administration Account.
  • Browse to /Macintosh HD/Library/Application Support/ProApps folder (your path may be different if  you named your hard disk.

ProApps File Location

  • Right Click (command click) on the ProApps Folder to display the properties of the folder.  Note the Sharing & Permissions section down the bottom.

ProApps Info

  • Unlock the folder and ADD (use + button) your normal non-administration account.  In this example it is the "home" account.  Give the account Read & Write permissions
  • Select the Gear Button and apply the changes to enclosed items.
Apply changes to Enclosed Items
  • Switch back to your non-administration account and Aperture should work!

Saturday, April 3, 2010

From my iPad

Well I haven't posted in a while ... Been really busy with work. But I couldn't resist posting today, on iPad launch day!

I am not normally an early adopter, but I couldn't resist heading over to the Apple Store this morning and picking up a 32 GB iPad.

I didn't preorder, and was pleasantly surprised that I was able to get into the store very quickly (20minutes). I walked out after 15 minutes with my new iPad.

I'll be posting my unboxing video and some pics later.

My first impressions are very positive, and my typing is definitely improving :).


Thanks Steve!

Tuesday, October 13, 2009

HowTo trim a Flip Video clip with FlipShare

If you using FlipShare to manage your video clips shot with your flip camera, then you have probably run across the need to trim the video clip down to extract a section of the video.

Trimming a video using the FlipShare application is very easy as I'll show in this post.

  • Start up your FlipShare application and select the video clip that you want to trim
  • To trim the video, click on the scissors icon at the bottom right of the video clip


  •  Once you click the scissors, you will be presented with a small edit window that has two tabs on the bottom of the video slider.  Move the left tab to change where the starting position of the clip will be.  move the right tab to change where the ending position of the clip will be.  You can slide the whole tab or click the arrow buttons to move one frame at a time (there are approximately 30 frames per second, so clicking the buttons can be slow).   Play around with the tab positions to get your clip just right.

  • Once you have the clip just right, select the Save button, which will over-write the original clip with your trimmed clip, or select Save As, to save a copy of the clip.  If you wish to cancel the operation, just click the Close button without saving the clip.