Saturday, January 25, 2014

Journey to App - Part 4: Prototyping your App

We have covered defining the requirements for the App in Part 1, wire framing in Part 2, and App development tools in Part 3 of this blog series.  In this installment, I will discuss prototyping.

In my app development process, I use prototyping to quickly ensure that the key functional requirements of the app can be met.  Depending on the needs of the app, you will typically prototype portions of the "business logic" and the "user interface". The term "Business Logic" is used to describe the key functionality that the App delivers.  The term "user interface" is used to describe how the user interacts with the app to use the functions.

For the Webpage to PDF app, we have defined 3 "business logic" functions; receiving a URL and converting it to a PDF File, displaying and managing PDF files, and keeping track of the URL history.  Because the app is using the ChariTi app framework, there is less to prototype on the user interface side.  

When prototyping, the goal is to quickly program solutions for the function that you are prototyping, with a focus on learning how to solve the problem.  Once all the key elements have been prototyped, you will often need to revisit the prototyped code and clean it up, to make it robust, error free, and ready for a production app.

The rest of this post will cover the prototyping of the apps key functions.  As the prototyping proceeds, I'll update the post and update the source code on GitHub at http://www.github.com/timalosi/Journey2App


Receiving URL and converting to PDF

For this function here are the items that I want to ensure works

  1. Make sure that the user can launch (or resume) the app from safari or chrome
  2. Make sure we can display a web page that the user can interact with before converting it to a PDF File
  3. Make sure we can create the PDF file from the web page that is selected by the user.
Passing the URL
In order to pass the URL, we need to create a URL scheme and register it so that the device knows what to do with it.  As we are starting with web pages, we can expect that the URL will start with http:// or https://.  

To make it easy for the user, we will register a few URL schemes.  We want something easy to remember, so we will use pdf://, pdfs:// as well as pdfhttp:// and pdfhttps://.  That way a user can go to the address bar in the browser and change the URL from (for example) http://fivebytes.blogspot.com to either pdf://fivebytes.blogspot.com or pdfhttp://fivebytes.blogspot.com.  When the device detects these URL schemes, it will launch our app, and pass the URL to the app.

To set up the URL scheme handler (in Titanium), we will update the tiapp.xml file and include the following XML snippet.  When Titanium builds the app, it will encorporate the XML into the apps info.plist file.


<key>CFBundleURLTypes</key>
<array>
<dict>
<key>CFBundleURLName</key>
<string>com.snackableapps.gopdf</string>
<key>CFBundleURLSchemes</key>
<array>
<string>gopdf</string>
<string>pdfhttp</string>
<string>pdfhttps</string>
<string>pdf</string>
<string>pdfs</string>
</array>
</dict>
</array>

Handling the Passed URL
When the app starts or is resumed, your iPhone or iPad passes arguments to the app.  One of the arguments is a URL.  Since we registered our pdf(s):// and pdfhttp(s):// URL schemes, we can expect that a URL may be passed to the app, and if it is, we need to convert it back to the standard http:// and https:// and then display the URL in a web browser.  In Titanium, when an app is resumed, an event is fired.  We will listen for that event, and look for a passed URL.  (We will only look for a resumed event for this prototype, but will have to handle a URL passed on launch as well when we finalize the code).

Converting to PDF:
The ChariTi framework comes with a pretty decent "browser" built into it, but the default Titanium web view doesn't support the conversion to PDF.  I have modified this web view as part of another App (sorry, this is the only component that I haven't open sourced in this app yet ... but http://github.com/viezel/NappPDFCreator is a very similar approach that is open source).  The reason, I am not using the NappPDFCreator module, is I want the user to be able to interact with the browser before converting, and NappPDFCreator simply takes the URL passed to it.  We will use a enhanced WebView to convert the URL to a PDF File and store it to the Apps document folder

Screencast of the URL scheme prototype on YouTube at http://youtu.be/uvHIS6TohAM


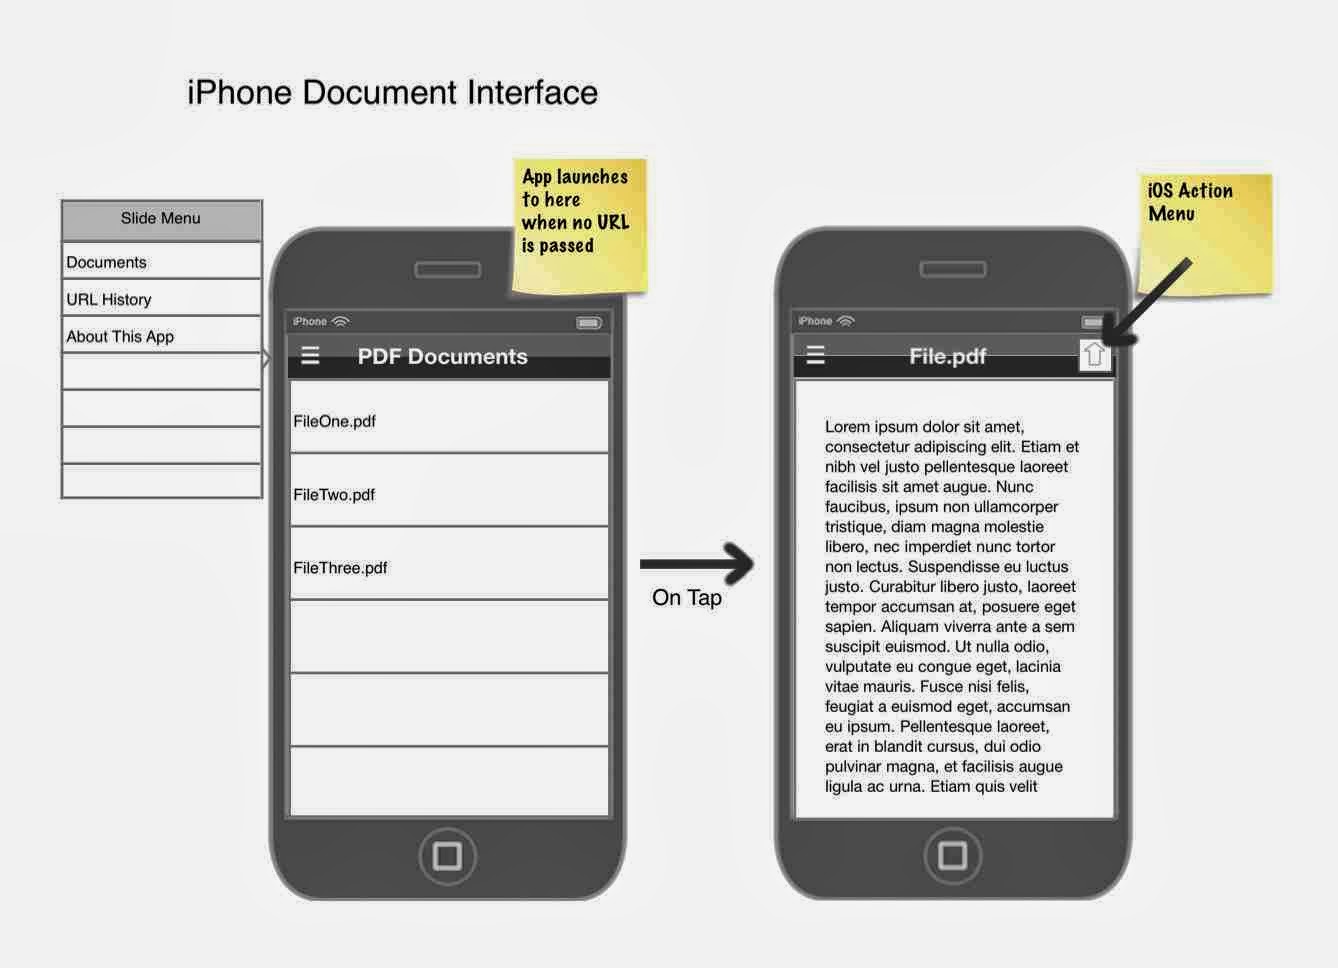
Managing the PDF Files

For this function here are the items that I want to ensure work.

  1. Displaying a list of files that were converted
  2. Allowing the user to view a file and perform actions (print / mail / send to another app)
  3. Allowing the user to delete a file
Displaying the Files
Like a computer, the iPhone or iPad stores files in folders.  For us to display the converted PDF files, we need to know what folder the files are in, and we need to be able to read all the files and then display a list.  I have a file utility script that is a good starting point, but for the App, I will need to add a few functions, specifically, creating a directory, and reading the contents of the directory and passing back an array of files.  Check out the FileManager.js file in the /app/lib folder of the GitHub repository.  One of the nice things about Titanium is that you can easily create re-usable utility scripts that you can include in your app and reuse.  In general, if you are doing a "generic" function like creating or reading a directory, it is often best to spend a bit of time to create a reusable function.  As you write more apps, this will definitely save you time in the future.


Interacting with the Files
Once the files are displayed in the TableView controller, we need to "listen" for user generated events.  The two event that we would care about are the "click" event and the "delete" event.  All TableViews will generate a "click" event, but to receive the delete event, you need to enable editing on the TableView.  Setting up event listener functions for these events will allow us to display or delete the file based on the user's actions.

Screencast of the PDF Management Prototype on YouTube at http://youtu.be/N1MJ7-JtHHY


Managing the URL History

Similar to managing the PDF Files, prototyping the URL History functions will focus on:
  1. Displaying a list of URLs that have been converted
  2. Allowing the user to view the web page associated with the URL (and convert it again)
  3. Allowing the user to delete a URL from the history.
Managing the URL History
For managing the URLs, I will duplicate the interface for managing the PDF files.  There are two main differences that I need to develop.  First, unlike the files, there is no representation of the URL history.  To solve this, I will create a Model Collection in Alloy.  This will allow us to store the URLs in a database for display.  The second difference is that rather than displaying the file, we need to launch the Web Browser with the URL that the user selected.  For this, we will modify the WebBrowser that was already created to capture the URLs as they are converted and to notify the display that the history has changed.

Screencast of the Prototyped interface for managing URLs at http://youtu.be/_ZBcybzJ8OU


Part 4 - Prototyping Summary
The prototyping for the Web Page to PDF App was pretty straight forward.  The App has just a few defined functions.  But the act of prototyping still has value.  In almost every development project, there is some aspect of the App that you haven't done before.  If the key functions of the App depend on something that you haven't done before, you really should prototype it.  It is much better to "fail" quickly than to put in a lot of hours on an App to find late in the game, that you cannot deliver a key function.

UP NEXT: Now that the prototyping is done, it is time to take a look at how the User Interface (UI) will need to change based on whether the user is running the app on an iPhone or iPad.

Running Total Hours
Activities
  • Prototyping URL handling and converting - 1.5 hr
  • Prototyping PDF file management - 1 hr
  • Prototyping URL history management - 1 hr
Total hours to date: 7.5 hr

Previous Part 3 - Tools 
Next Part 5 - iPhone and iPad

Tuesday, January 21, 2014

LogMeIn.com ... a kick to the jimmies

Bummer ... just got the email below.  More than a ZERO day notice would have been nice.

As of January 21, 2014, LogMeIn Free will no longer be available. To continue using remote access, you will need to purchase an account subscription of LogMeIn Pro.

A new Pro account includes our signature remote access with premium features like remote printing, file transfer and cloud data access, plus desktop, iOS and Android apps to improve your experience.

As a loyal LogMeIn user, you are eligible for discounted introductory pricing. Subscription packages start at $49/year for two computers (50% off regular price)*. Visit the pricing page for details, and buy now.

Thank you for your continued support. We look forward to serving you for many years to come.

Sincerely,
The LogMeIn Team

Please visit out blog for more information. 

*Introductory prices apply only to the first year of your subscription. 

Monday, January 20, 2014

Journey to App - Part 3: The Tools

In this third installment of this blog series, we will review the tools that I use for App Development.

Application Framework / Platform
Since I was looking to develop Apps for both the iOS and Android platforms, I decided to use a "platform independent  application development environment.  The tool set that I decided to use was the Titanium platform by Appcelerator (http://www.appcelerator.com).  Titanium is a pretty functional platform.  Most of the application code is developed using standard Javascript and Titanium's API.  The Titanium package then packages up the Javascript and uses their bridging technology to link the javascript to native objects in iOS, Android, Blackberry, Tizen, HTML5 and (soon) Windows Mobile.  This allows one to create mostly platform independent code that will work on multiple platforms (Most Apps still require some differences between platforms, but Titanium really helps keep the differences small).  In addition to the javascript code, you can still write "native" modules in Objective C (for iOS) or Java (for Android) to provide functionality that the Titanium platform may lack.

Another great point about Titanium, is that it has a free community addition, and the SDK is open sourced.

Computer Platform
For developing iOS apps, you MUST have a MAC OS X computer.  You need to install XCode, the Object C development enviornment, and you must have an Apple Developer account ($100 / year).  If you are only developing Android apps, most of this blog series will still apply, and you can develop on Windows, and Linux computers as well as Mac.  For Android Apps, you need the Android SDK and a Google Play Developer Account ($25 / year).

Source Code Management
Titanium supports GIT for source code management.  You can maintain local GIT repositories in Titanium, as well as synchronize the local GIT repositories with remote repositories.  GitHub (http://www.github.com) is a great cloud service for open source projects.  BitBucket (http://www.bitbucket.org) has online GIT repositories for both open and closed source projects.

For this project, I will be open sourcing the App code, and have created a repository on GitHub at http://www.github.com/timalosi/journey2app.

I highly recommend using a source code management system.  I have used Subversion (SVN), MS Sourcesafe, and GIT, and for the most part they all work similarly.  Since GIT is built into Titanium, it makes sense to use it for Titanium Apps.

Graphics Program
There are very many graphics programs floating around out there.  In general, you need to be able to create .PNG images for the app icon, splash screen and other app assets.  I like to work in a vector drawing program, like Inkscape or Illustrator, since you can seamlessly scale your art, and then export at the correct size for the App.  Since we are using other open source tools, I would recommend Inkscape (http://www.inkscape.org) for vector graphics and GIMP (http://www.gimp.org) for image manipulation.


Wire-Framing and App Layout
Check out part 2 of the blog series for details on laying out your app. For wire framing, you can use anything from paper and pencil, to a specialized program.  A few apps that I use on the iPad include iMockups for iPad and Noteshelf for iPad.

App Framework
With Titanium, there are several programming patterns that you can use for writing the source code for apps.  The basic pattern is a factory pattern, where each object and function is coded directly in javascript.  The good folks at Appcelerator have also developed a Model / View / Controller (MVC) framework called ALLOY, where the views are coded in XML and CSS (not really CSS, but close enough) , and the Controllers are written in javascript.  Following the MVC Pattern in general is a good idea as it speeds development.  For the Webpage to PDF app, I'll be using the Alloy MVC framework.

In addition, Matt Congrove, from Appcelerator, has released an open source application framework for Alloy called ChariTi (http://chariti.mobi).  The framework was written to speed the development of applications for non-profits, but it has some nice features that I like, so I will adopt it for this project (modified for the Apps needs).

Part 3 Wrap Up
As you can see, there are not that many tools that you need to get started writing apps.  Have any suggestions?  Add them in the comments.

Running Total Hours
I decided to post the amount of time (cumulative) for the App development process ... not including writing the Posts.  I'll update the effort summary in each post to give you an idea as to how long things take.

Activities

  • App Idea and Wire Framing - 2 hours
  • App Project Creation, Importing ChariTi framework, initial build, GitHub Repository Creation - 2 hours

Total - 4 Hours

Previous Part 2 - Layout 
Next Part 4 - Prototyping

Sunday, January 19, 2014

Journey to App - Part 2: Layout and Wire Framing

This is the second post in my series on writing and publishing iOS Apps.  (Check out Part 1).

This post will review my second step in developing an App; Layout and Wire Framing.  Once you have the basic idea for the App, and the basic user requirements, the next step that I follow is to layout the main interface for the App.  For me, this activity serves as a first pass through how the user will interact with the app, and it also blocks out the main functionality that the App will need to have.

For wire framing, you can use anything from paper and pencil, to a specialized program.  A few apps that I use on the iPad include iMockups for iPad and Noteshelf for iPad.

When laying out an app, you need to determine if the App is targeted for the iPhone/iPod, the iPad, or both.  For the Webpage to PDF App, we want to target both the handheld and tablet form factors.   When laying out the App, it is important to think about how the user will interact with the app when it is run on a handheld or tablet, and try to optimize the user experience based on the different devices.

For the Webpage to PDF app, we have identified two main functional paths ... selecting and viewing PDF Files, and selecting, viewing and converting web pages. 


On a handheld device, these two functions will be handled similarly.  There should be a list (or "TableView" to display the list of documents, or URLs.  When a user taps on one of the list items, the phone will show the item full screen.  On the iPad, there is more screen real-estate, so we can display both the list and the content at the same time.

For a complex App, you should probably run the layouts by a User Experience (or UX) expert. I happen to know one, so if he has any comments ... I'll add them to post.

The pictures below show the App layout that I did using iMockups.


 With the layout drafted, it is time to start the programming.

Up Next ... Development Tools.  In the next post, I will discuss the tools that I use for app development.

See anything missing from the layout?  ... add a comment below!


Previous Part 1 
Next Part 3 - Tools 

Saturday, January 18, 2014

Journey to App: Writing and publishing an iOS App Part 1

For the last few years, I have been developing and publishing some iOS and android apps.  I published a few apps for my previous employer, and I have published a few for myself.  (Check out SnackableApps.com for my currently published Apps).

When I tell people that I write apps, they often ask about the process and how hard is writing an App.  Depending on their technical background, it isn't always an easy question to answer.

So I decided to do a series of blog posts that will document the process I use to develop an app.  As a companion to these posts, I will also Open Source the App Code, and in the end, I'll publish the app to the Apple App Store and you can download the App. 

Please NOTE: This blog series is NOT a HOW-TO.  Google is a wonderful reference if you need specific help on a topic, and there are great communitties of wonderful, helpful people that will point you in the right direction.  This series IS a description of the process of writing an App.  I hope you enjoy the posts ... and add comments if you have any.

The app process is more than just writing software code, and I will also cover setting up the support system, monetizing the app, and some basic App marketing as well.

The focus of this post will be "The Idea".

Each app has to start with an idea.  Now, coming up with ideas for apps is not that difficult ... coming up with an idea for a great app, that is very elusive.

For this series of posts, I decided not to tackle anything too ambitious, so I want to start with a pretty simple problem to solve.  I often come across articles and information on the web that I either want to read later, or that I want to save.  A really good way to do that (and one that I use on my laptop) is to save the web page to PDF.

So the focus of this App will be to save a web page to PDF.  Yes I know there is a bunch of apps out there (paid and free) that do this, but I think that it is a good problem for this series of posts.  (Comment on this post if you would have different ideas that you think would be interesting to write an blog series on).

Web Pages to PDF ...  What are the Requirements
So ... what does the App need to do?  Defining the "User Requirements" should be the first step in evaluating an idea and developing an App.  Here are the requirements for our PDF App. (have additional requirements?  add them in the comments).

In iOS on the iPhone or iPAD, most people browse the web using either Safari or Chrome.  It is unlikely that they will open up the App to browse the web, so ...
1. We need to pass a URL from Safari or Chrome to the App

Some web sites require a password, or other user input, so ...
2. The App needs to show the web page so that the user can interact before creating the PDF

Web addresses often do not provide good "file names" that would be required for naming the PDF File, so ...
3. The user needs to be able to set the file name, but it would be nice if the App could propose a file name from the URL

Assuming that the user will use the App more than once ..
4. The App needs to be able to display a list of the PDF files that the user has created.
5. The App needs to be able to read / display the PDF
6. The App needs to be able to send the PDF file to other apps, such as iBooks or Good Reader
7. The user needs to be able to delete PDF files that they no longer want.

It is possible that the user may want to create PDFs of the same URL more than once (say for a news site or other sites that change content frequently), so ...
8. The App needs to be able to save and display the history of URLs that have been converted.
9. The user needs to be able to delete URLs from the history list.

Sounds like enough requirements to make the App usable for many users, but still keeps the app Simple. 

Next up ... Laying out the App ... Once we have the requirements understood, it is time to start laying out (also called wire framing) the App.

That will be the topic of our next post.

Hope that you will follow me on this journey to an iOS App!

Next: Part 2